IP kamera M24 - Dnevna ili noćna IP kamera |
|

Više mogućnosti u manjem izdanju!
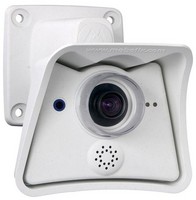
Profesionalna IP kamera sa izamenljivim sočivima namenjena za spoljašnju i unutrašnju upotrebu. Interni digitalni video rekorder (DVR) sa internim prostorom za skladištenje(do 64 GB) i HiRes modom snimanja rezolucije do 3.1 megapiksela. Više od 30 puta detaljnija slika nego u CIF rezoluciji.

Mobotix HiRes IP kamera može da zameni i do 6 analognih kamera
- Individualni izbor sočiva: tele/širokougaona, dan/noć režim rada, CS-Mount i hemisferna (180°)
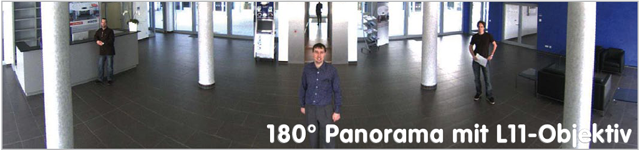
- Idealna za video nadgledanje kao i 180° panorama web kamera
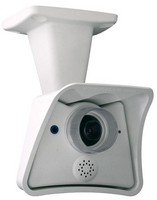
- Brza i jednostavna instalacija na zid, stub ili plafon
- Integrisan DVR sa opcijom HiRes video snimanja bez opterećenja računarske mreže
- Robustan, bez potrebe za održavanjem i otporna na sve vremenske uslove (-30° do +60°C (-22° to +140°F), (IP66))
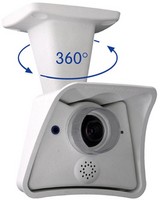
- Digitalni zum, pan i tilt
- Mikrofon i zvučnik sa poboljšanim kvalitetom zvuka

* ? MOBOTIX AG ·Information subject to change without notice!


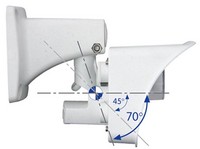
| Mounting Options | |
Mounting to a wall |
Mounting to a Ceiling |
|
|
|
|
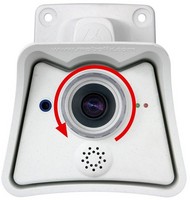
Tilting (wall mount) |
Tilting (ceiling mount) |
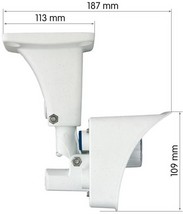
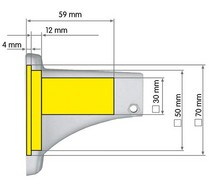
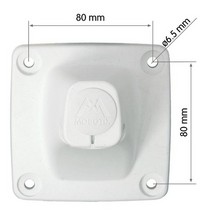
| Dimensions | |
The SecureFlex mount enables easy mounting of the MOBOTIX M24M models to a wall or ceiling; the concealed cabling enhances the visual impression of the installation. The foot of the supplied wall mount is large enough to elegantly cover wall outlets.
|
|
|
|

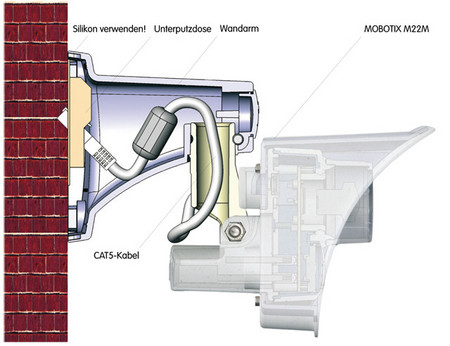
| Mounting Instructions | |
Mounting the Camera over Wall Outlets
 Mounting the SecureFlex mount to a wall allows covering RJ45 wall outlets (without frame) and also allows using a defined network end point.
When positioning the wall outlet, make sure that the outlet lines up with the upper rim of the mount later on (see figure below and the drilling template at the end of the manual).
If no wall outlet is present, use a suitable extension or an adapter to connect the camera to the network.
When installing an above-the-wall assembly, breaking out one of the four openings in the base of the mount will provide for properly guiding the cable into the mount.
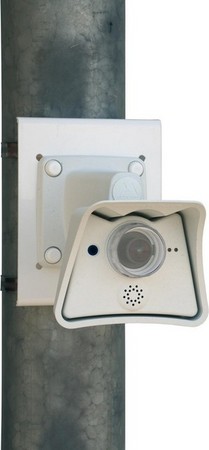
Mounting on the Pole Mount
If you are intending to mount the camera on a pole, you should consider using the MOBOTIX SecureFlex Pole Mount. This mount is made of 3 mm powdercoated stainless steel (white) and has been designed specifically for outdoor use. The supplied stainless steel straps allow fixing the mount to poles with diameters between 60 and 180 mm (2.4" to 7.1").
| Changing Lenses | |
The M24M can be fitted with several MOBOTIX lenses. Proceed as follows to change a lens:
|
|
This procedure is the same for the M24M-Sec-CSVario and CS/C mount lenses, albeit without the lock ring (not installed).
| Connecting the Camera | |
The MOBOTIX camera does not require any software installation; all you need is your preferred browser with JavaScript support to operate the camera. Thus, the MOBOTIX camera is supported by all common operating systems (such as Windows, Macintosh and Linux, ...).
If the camera is supplied with Power over Ethernet (a PoE switch), then no other device will be necessary for supplying power.
Establishing the Power Supply to the Camera
You can choose between the following options:
- External power supply and Network Power Adapter (MX-NPA-3-RJ): Power supply of one camera injected into the network cabling (max. length 100 m (110 yd)), from the NPA to the 10BaseT/NET connector of the camera.
- Network Power Box/Rack (MX-NPR-4, or 8/20): Power supply of 4/8/20 cameras injected into the network cabling (max. length 100 m (110 yd)), from the NPR to the 10BaseT/NET connector of the camera.
- Power over Ethernet: Power supply using network components that are conforming to the PoE standard.
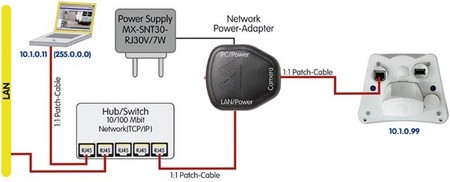
Power Supply (MxPoE) Using a Switch
- Connect the factory pre-installed cable of the camera to the Camera connector of the Network Power Adapter.
- Connect the LAN/Power connector of the Network Power Adapter to an Ethernet connector of the switch/router or the Ethernet wall outlet.
- Plug the RJ45 connector of the external power unit into the PC/Power connector of the Network Power Adapter.
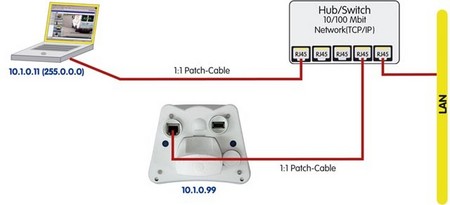
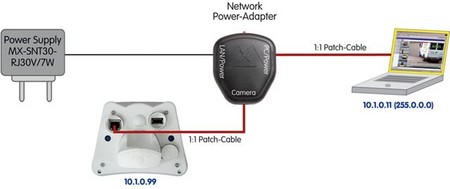
Power Supply (MxPoE) When Connected Directly to a Computer
- Connect the factory pre-installed cable of the camera to the Camera connector of the Network Power Adapter.
- Connect the PC/Power connector of the Network Power Adapter to the Ethernet port of the computer.
- Plug the RJ45 connector of the external power unit into the LAN/Power connector of the Network Power Adapter.
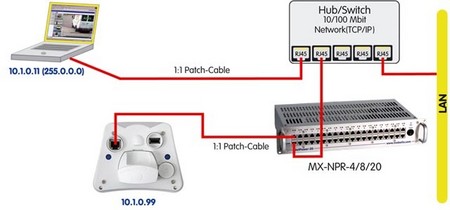
Power Supply (MxPoE) Using a Network Power Rack or Network Power Box
- Connect the factory pre-installed cable of the camera to the CAM connector of the Network Power Rack (MX-NPR-8/20) or the Network Power Box (MX-NPR-4).
- Connect the LAN connector of the Network Power Rack or Network Power Box to an Ethernet connector of the switch/router.
Power Supply (PoE IEEE 802.3af) Using Power-over-Ethernet Products
Connect the factory pre-installed cable of the camera to the Ethernet connector of the PoE switch/router. The switch/router needs to support the PoE standard IEEE 802.3af.