| IP Kamera D24 - Dome IP kamera |
|
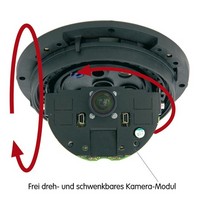
Uklapa se . Proveri
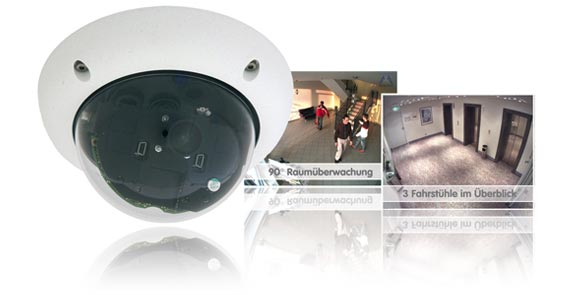
Neupadljiv video nadzor sa state-of-the-art tehnologijom. D24 FixDomeIP kamera iz Mobotix-ove ponude prilagođava se i najzahtevnijem korisniku. Izmenljiva sočiva, mogućnost različitih opcija montaže i konfiguracije i dodatni vandal set, D24 FixDome izdvaja kao rešenje za nadzor sa neograničeim mogućnostima primene.


Mobotix HiRes IP kamera može da zameni i do 6 analognih kamera
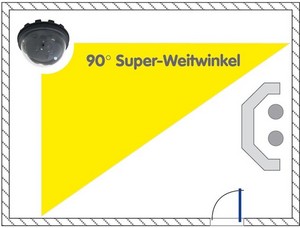
- Atraktivan dizajn sai izmenljivim sočivima od Super širokougaonih (90°) do tele sočiva (15°)
- Brojne opcije za unutrašnju i spoljašnju instalaciju
- Zidni set za dodatne module(beterije,UMTS, WLAN...)
- Integrisan DVR sa HiRes modom snimanja (uključna 4 GB MicroSD kartica)
- Robustan, bez potrebe za održavanjem i otporna na sve vremenske uslove (-30° do +60°C (-22° to +140°F), (IP66))
- Može se nadograditi na interfonski sistem sa Mobotix ExtIO modulom
- Digitalni zum, pan i tilt

*2008/06 • MSRP (Manufacturer's suggested retail prices) • Prices ex works Langmeil, Germany (EXW) • Excluding VAT and any other handling charges • Information subject to change without notice!


| Mounting Options | |
Mounting to a Ceiling or Wall
The MOBOTIX D24M has been designed to be mounted to either ceilings or to a wall, when using the Wall Mount. The supplied L22 90° lens then allows monitoring almost the entire room from the walls to the ceiling. It is also possible to mount the D24M directly to a wall (without using the Wall Mount), but doing so will result in reduced flexibility for positioning the lens. We hence recommend using the Wall Mount if you intend to mount the camera to a wall.
Additional Mounting Options for IT/Secure Models
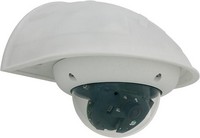
On-Wall Mounting (D24M-OPT-AP) |
|
The On-Wall set can reliably protect external cables if the cables cannot be guided from below the housing but have to be led above the wall. In addition, the On-Wall mount provides ample space for extra modules. |
|
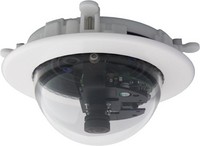
In-Ceiling Mounting (D24M-OPT-TC) |
|
The In-Ceiling Set allows mounting the camera in fake ceilings, for example. This type of installation provides optimum protection for the camera and reduces the visible profile to a minimum since only the dome is visible. |
|
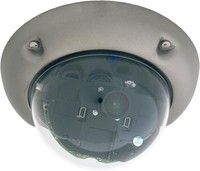
Vandalism Protection (D24M-OPT-VANDAL-...) |
|
The Vandalism Set provides added protection for the cameras. The set consists of a robust camera ring made from stainless steel and a reinforced dome made from 3 mm thick polycarbonate. A camera equipped with the Vandalism Set is perfectly suited for applications in demanding environments (such as prisons, social hot-spots, train stations, etc.). |
|
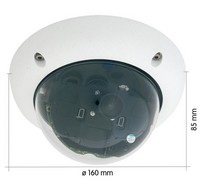
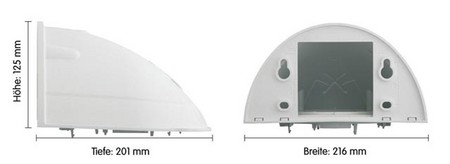
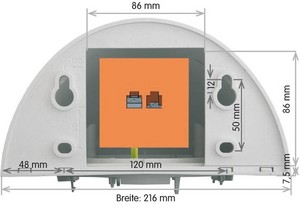
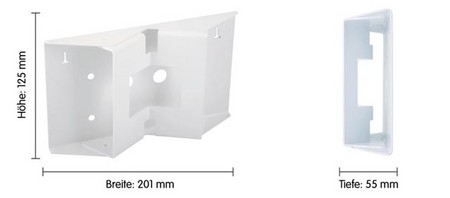
Mounting to a Wall Using the Wall Mount (D24M-OPT-WH) |
|
The Wall Mount is the ideal solution for mounting the camera to walls for indoor and outdoor applications. The camera is absolutely dustproof and resistant against water jets (IP65). The wall mount also covers RJ45 wall outlets and also has ample space for additional modules. |
|
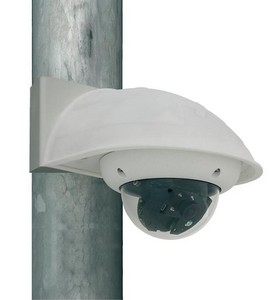
Mounting to Poles Using the Corner and Pole Mount (D24M-OPT-MH) |
|
If you would like to mount the camera to a pole or the corner of a building, you should consider using the MOBOTIX Corner and Pole Mount. This mount can only be used in conjunction with the wall mount. The supplied stainless steel straps allow fixing the mount to poles with diameters between 60 and 180 mm (2.4 to 7.1 in). |
|

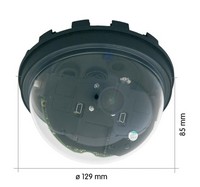
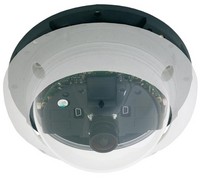
| Mounting Types D24M-Basic | |
The MOBOTIX D24M-Basic consists of the camera housing with the motherboard, the lens and the dome.
|
|

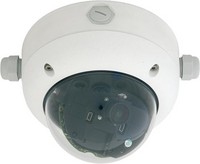
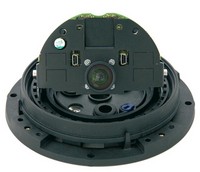
| Mounting Types D24M-IT/Secure | |
The MOBOTIX D24M-IT/Secure consists of the camera housing (motherboard, lens, dome), the outer shell and the mounting ring.
|
|
| Mounting Instructions | |
Wall Mount
The Q22M/D24M Wall Mount is the ideal solution for mounting the Q22M to walls for outdoor applications.The camera is absolutely weatherproof (IP65). The wall mount has ample space for additional modules (UMTS, WLAN etc.).
The Wall Mount also covers RJ45 wall outlets and also has ample space for additional modules.
Pole Mount
If you would like to mount the MOBOTIX D24M to the corner of a building or a pole, you should consider using the MOBOTIX Pole Mount, which is used in combination with the wall mount. The supplied stainless steel straps allow fixing the mount to poles with diameters between 60 and 180 mm (2.4 to 7.1 in).
The Pole Mount is made from 3 mm white powdercoated stainless steel and is just as robust and maintenance-free as the outdoor Wall Mount.
| Adjusting the Lens | |
Manually adjust the lens of the D24M in a simple way.
Mounting/Dismounting the outer shell (nur IT-/Secure models only)
Always use the Allen screws, included in the delivery (or security screws and spacers for Vandalism Set). |
|
Mounting/Dismounting the Dome |
|
Take the delivered plastic foil or a cotton cloth and remove the dome by turning it in counter-clockwise direction. Make sure that you remove the camera's outer shell on IT/Secure models before you attempt to do this. |
|
Release the lens' lock ring and adjust the image focus by turning the lens in its holder. Check the image on the computer monitor. Make sure that you tighten the lock ring again once you are finished. When tightening the lock ring, firmly hold the lens to prevent it from losing the focus setting. |
|

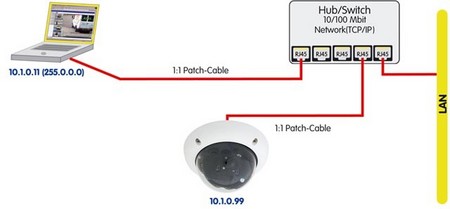
| Connecting the Camera | |
The MOBOTIX camera does not require any software installation; all you need is your preferred browser with JavaScript support to operate the camera. Thus, the MOBOTIX camera is supported by all common operating systems (such as Windows, Macintosh and Linux, ...).
If the camera is supplied with Power over Ethernet (a PoE switch), then no other device will be necessary for supplying power.
Establishing the Power Supply to the Camera
You can choose between the following options:
- External power supply and Network Power Adapter (MX-NPA-3-RJ): Power supply of one camera injected into the network cabling (max. length 100 m (110 yd)), from the NPA to the 10BaseT/NET connector of the camera.
- Network Power Box/Rack (MX-NPR-4, or 8/20): Power supply of 4/8/20 cameras injected into the network cabling (max. length 100 m (110 yd)), from the NPR to the 10BaseT/NET connector of the camera.
- Power over Ethernet: Power supply using network components that are conforming to the PoE standard.
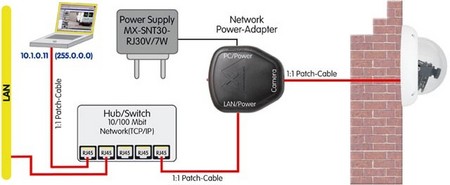
Power Supply (MxPoE) Using a Switch
- Connect the factory pre-installed cable of the camera to the Camera connector of the Network Power Adapter.
- Connect the LAN/Power connector of the Network Power Adapter to an Ethernet connector of the switch/router or the Ethernet wall outlet.
- Plug the RJ45 connector of the external power unit into the PC/Power connector of the Network Power Adapter.
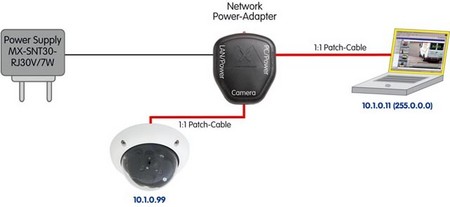
Power Supply (MxPoE) When Connected Directly to a Computer
- Connect the factory pre-installed cable of the camera to the Camera connector of the Network Power Adapter.
- Connect the PC/Power connector of the Network Power Adapter to the Ethernet port of the computer.
- Plug the RJ45 connector of the external power unit into the LAN/Power connector of the Network Power Adapter.
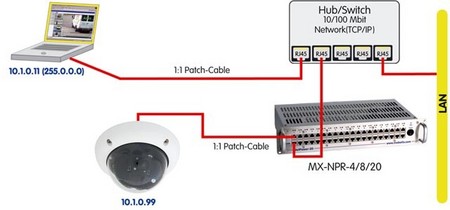
Power Supply (MxPoE) Using a Network Power Rack or Network Power Box
- Connect the factory pre-installed cable of the camera to the CAM connector of the Network Power Rack (MX-NPR-8/20) or the Network Power Box (MX-NPR-4).
- Connect the LAN connector of the Network Power Rack or Network Power Box to an Ethernet connector of the switch/router.
Power Supply (PoE IEEE 802.3af) Using Power-over-Ethernet Products
Connect the factory pre-installed cable of the camera to the Ethernet connector of the PoE switch/router. The switch/router needs to support the PoE standard IEEE 802.3af.